How To Load A Custom Function In PowerShell

OR – How To Set Security Permissions To Run Other People’s PowerShell Scripts

I had to configure a custom PowerShell function on my clustered file server to try to fix a permissions issue I ran into after one of my SANs failed. Google was nice enough to point me here http://learn-powershell.net/2014/06/24/changing-ownership-of-file-or-folder-using-powershell/ where I found a solution to my problem. When you’re in crisis mode, it can sometimes take you a minute to remember to set security correctly to run a downloaded .ps1. So, since I rarely forget to do something I blog, this is more for me than for you 😉

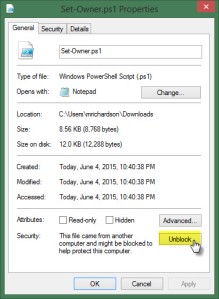
On the bottom of Boe’s blog, there is a download link that sends you to the TechNet Gallery to download the .ps1 file.  For the sake of simplicity I downloaded it to C:\Users\mrichardson\Set-Owner.ps1 since that is the root folder PowerShell opens in. If this is a function (or script) you anticipate using frequently, a better location would probably be your Modules folder.  Browse to the function/script you downloaded, right click on the file, go to Properties, then on the General Tab, and click the “Unblock” button at the bottom.

Unblock POSH

Next, open PowerShell with Administrator Privileges and set the Execution Policy to “Remote Signed”.  This will allow you to run a script or function from a different system.  You set the Execution Policy by running the following PowerShell command:

Set-ExecutionPolicy remotesigned

Now you can load the function by running the following command (substituting the appropriate file name).

. ./Set-Owner.ps1

You should now be able to use the function as per its article. Happy scripting!

Using PowerShell to Manage Distribution Groups in Exchange 2007

This is a quick post for a small task I found the basis for the commands in Ying Li’s post here.

We had an admin leave us and go to Facebook recently.  She was a member of a TON of our distribution groups set up for all of our Amazon Web Services account.  Well, I couldn’t go into ECM and remove the user from the groups, and there were a bunch of them, so I really didn’t want to click each individual group and remove her.  So, I did a quick google search and strung a command together remove the user from the groups.

All of our AWS accounts start with AWS, i.e. AWS-ClientName@company.com.  So, this is what I came up with:

Get-DistributionGroup "AWS*" | Remove-DistributionGroupMember -member oldadmin

That worked like a charm.  So, I then ran this command to add myself to those same groups:

Get-DistributionGroup "AWS*" | Add-DistributionGroupMember -member mrichardson

That too worked like a charm.  I had some other cleaning up to do, so I encorporated a couple other commands to remove the old admin from all groups.  That required two different commands:

Get-DistributionGroup "*" | Remove-DistributionGroupMember -member oldadmin
Get-SecurityGroup "*" | Remove-SecurityGroupMember -member oldadmin

Of course I got errors for the groups she was not a member of, but that was to be expected. That pretty much sums it up.  Hope this is helpful for someone.

Using PowerCLI to Auto-Update VMWare Tools

If you’ve ever read my blog you already know I like to ramble, so if you’d like to get to the nitty gritty of this script, skip down to the “Rubber, meet Road” section.

First of all, excuse my ‘noobness’ as I recently started supporting a VMWare server cluster, and sometimes those of us that just start working with a proven technology, find things and go… “Holy Crap! You can do that?” A while ago, we upgraded our VCenter to version 4.something-or-other. After that upgrade, you have to upgrade the VMWare Tools. Well, while I was attending one of the local VMUG meetings, someone mentioned that you can do the upgrade and suppress the reboot via command line. So, once I got back to the shop, I used this simple command:

Get-VM vmname | Update-Tools –NoReboot

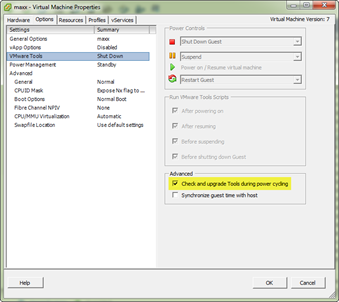
That was handy. All guests upgraded, no reboots, upgrade will complete during reboot of next patching cycle. Marvelous! Then, later I was digging around and found this setting:

I said to myself…. you guessed it, “Holy Crap! You can do that?” So, I started flipping through all of our Windows guests and turning that on, making it so I didn’t have to worry about it ever again. Then came the arrival of VCenter 5.0. We diligently upgraded our VCenter and hosts shortly before a patch cycle. After the patch cycle, all of my servers were still reporting that their VMware tools were out of date. Scratching my head, I double checked, and the previous settings for the auto-update during power cycle had been reset to default which is unchecked. UGH! The first time around, I thought I’d only have to do it once, so I changed the setting manually for my 100+ servers. This time, I decided to write a script, especially since the upgrade had changed my settings back to default, so there was a good chance this would happen again. Not only that, I can set this script to run automatically before each patch cycle so any new VMs will get set as well.

Of course, I started out with our friend Google. I found a pretty darn good post by Damian Karlson where I got most of my script and a few other links from that page for some more information. What I didn’t find was a “Here is what you have to know if you’re a noob” post, so I had to do some figuring out on my own.

Rubber, meet Road

First of all, I use PowerGUI Pro Script Editor from Quest Software for all of my scripting needs. I highly recommend it. You also have to make sure you have VMware Vsphere PowerCLI installed on the workstation that you’re running the script on. Also, make sure you have the PowerCLI libraries loaded. Secondly, you have to run your PowerCLI commands with appropriate rights. Check out my post on how to do that for programs by default (especially if you have a different account for admin rights). Thirdly, you have to connect to a server, which Damian’s post completely skips, because he and his readers know what they’re doing, unlike me. Finally, I had the challenge of having a large number of *nix systems that I have to skip since *nix admins are all picky about their software….. so, Damian’s original script just goes out, finds all VMs, and changes the setting. Mine needed to be a bit pickier. One of the comments in Damian’s post had a check in there to give me the command to single out Windows guests, so I put it all together, and this is what I got:

First connect PowerCLI to your VCenter server with this command:

Connect-VIServer -Server 10.10.10.10

Where, 10.10.10.10 is the IP of your VCenter server. You can connect to each host individually I believe, but if you have more than one host that doesn’t make sense if you have VCenter. This will prompt you for credentials, unless you launched the PowerShell instance with the user with appropriate permissions, then it will just connect you:

Name        Port User
—-        —- —-
10.10.10.10 443  DOMAIN\user

You could get a warning about an invalid certificate, a lot like you do when you connect with VSphere Client for the first time. You can turn off that warning with this command:

Set-powercliconfiguration -InvalidCertificateAction Ignore

Here is the script that I ran to change the setting on all of my Windows Guests:

Get-VM | Get-View | ForEach-Object{
Write-Output $_.name

if ($_.config.tools.toolsUpgradePolicy -ne “upgradeAtPowerCycle” -and $_.Guest.GuestFamily -match “windowsGuest”){
$vm = Get-VM -Name $_.name
$spec = New-Object VMware.Vim.VirtualMachineConfigSpec
$spec.changeVersion = $vm.ExtensionData.Config.ChangeVersion

$spec.tools = New-Object VMware.Vim.ToolsConfigInfo

$spec.tools.toolsUpgradePolicy = “upgradeAtPowerCycle”
$_this = Get-View -Id $vm.Id 
$_this.ReconfigVM_Task($spec)

Write-Output “Completed”
}
}

The only real difference between this script and the one Damian wrote is that mine will check if the Upgrade at Power Cycle flag is not already enabled, and then check if it is a Windows guest. If both conditions are true, then it will change the setting to “Upgrade at power cycle”. I referenced this post that discusses PowerShell’s If AND statements to refine line 3 of the script above.

Thanks to Damian and the comment made by Travis that got me 99% of the way to my solution.

Check State of Service, Start if Stopped


Interestingly, this seemingly simple task took me a bit to track down, and get put together. You’d think this would be a common task with lots of posts about it, but most of what I found was confined to starting and stopping the service, and few had the whole “check state” part included. I found several posts, but none of them worked for me. Finally, I found this post by Ralf Schäftlein that did the trick. In Ralf’s post, he is checking all VMWare services. My goal was to check and start SQL services of a particular SQL instance on a server, so I had to tweak his script ever so slightly to make it work. Here it is:

#This script uses the $SQLInstance variable to check if a particular SQL Instance’s services are running and start them if stopped.

$SQLInstance = “INSTANCENAME”

foreach ($svc in Get-Service)

{

if(($svc.displayname.Contains(“$SQLInstance”)) -AND ($svc.Status -eq “Stopped”))

{ echo $svc.DisplayName

Start-Service $svc.name

}

}

Save this as sqlservicecheck.ps1 and run it and you should be good to go. Quick note, the instance name search using .Contains is CASE SENSATIVE! That one added about 10 minutes to testing.


Zip, Chunk, and Transfer Files via FTP using PowerShell and 7zip

I had a unique problem and spent the last several weeks working on a script to resolve that problem. We have a client whose servers, SQL databases, and websites we are responsible for maintaining. The servers that are running everything are hosted. Our problem was, that there was no local copy of the database for backup, testing, and staging. So, my mission was to get the databases backed up offsite. My challenge was that one of these databases is 30+ GB. That is a lot of file to move over the wire. Luckily we have a VPN connection established between the two sites so I did not have to worry about security for this file transfer. If time permits, I may re-do this script with SFTP, but for now FTP will have to suffice.

I chose 7zip for my zipping and chunking because it was the easiest utility with the smallest footprint, and I got it to work via PowerShell.

I had every intention of keeping a list of my sources for this blog, but unfortunately due to the size of the database and my limited time in which to test, I lost track of all of the sites I used to put all of the pieces together that are necessary for this script. PLEASE, if you see something in this script that I took from one of your scripts (or forum responses), please leave a comment and I will happily give you credit where credit is due.

PLEASE NOTE: You have to place the PowerShell script in a completely separate folder from the files you’re processing. I did not write logic into this script to exclude .ps1 files from processing. I chose a self-describing folder: C:\DBFileProcessScript for the script and log files.

Here is the script with details surrounding what each portion of the script does:

<#
.SYNOPSIS
Zips up files and transfers them via FTP.
.DESCRIPTION
Searches the ‘DBBackup’ folder for all files older than two weeks with
the file extension .bak and moves them to a ‘Process’ folder. It then
moves all other files to a separate folder for cleanup. It then zips
the files and breaks them up into 100MB chunks for more reliable FTP file
transfer. Checks for any thrown errors and emails those errors once the
script finishes.
.NOTES
File Name : Zip_FTP_DBFiles.ps1
    Author : Matt Richardson
   Requires : PowerShell V2
First, we need to clear the error log.
#>

$error.clear()

#This portion of the script moves the files from the DBBackup folder to the
#Process folder if the file is more than two weeks old. It also moves the .trn
#and .txt files to a separate folder for cleanup later.

foreach ($i in Get-ChildItem C:\DBBackup\*.bak)
{
  if ($i.CreationTime -lt ($(Get-Date).AddDays(13)))
{
Move-Item $i.FullName C:\DBBackup\Process_Folder
}
}
foreach ($i in Get-ChildItem C:\DBBackup\*.t*)
{
 if ($i.CreationTime -lt ($(Get-Date).AddDays(13)))
{
Move-Item $i.FullName C:\DBBackup\Old_TRN_Logs
  }
}

#This portion of the script sets the variables needed to zip up the .bak files
# using 7zip. The file query portion of this section makes sure you’re not
# accidentally getting anything other than the .bak files in the event someone
# puts other files in this folder.

$bak_dir = “C:\DBBackup\Process_Folder”
$file_query = “*.bak”
$archivetype=“zip”

#Alias for 7-zip – needed otherwise you get Parse Errors. I had to move the 7z.exe
# file to both the Program Files and Program Files(x86) folders for this to work.
# I know I could have probably noodled with the script a bit more so that this
# wasn’t required, but I haven’t gotten around to that.

if (-not (test-path “$env:ProgramFiles\7-Zip\7z.exe”)) {throw “$env:ProgramFiles(x86)\7-Zip\7z.exe needed”}
set-alias sz “$env:ProgramFiles\7-Zip\7z.exe”

#Change the script so that is running in the correct folder.

cd $bak_dir

#This section chunks up the files and then deletes the original file. I had to do
# the removal for lack of space issues. I would recommend moving this part to the
# end assuming you have space.

$files=get-childitem . $file_query | where-object {!($_.psiscontainer)}

ForEach ($file in $files)
{
   $newfile = ($file.fullname + “.$archivetype”)
    sz a -mx=5 -v100m ($file.fullname + “.$archivetype”) $file.fullname
    Remove-Item $file
}

#This cleans up the tran and txt logs since we’re not copying them offsite.

Remove-Item c:\DBBackup\Old_TRN_Logs\*.t*

#This portion of the script uploads the files via FTP and tracks the progress,
# moving the failed files to a separate folder to try again later. The try
# again later part is yet to be written so for now I do it manually on failure.

foreach ($i in Get-ChildItem “C:\DBBackup\Process_Folder”)
{
   $file = “C:\DBBackup\Process_Folder\$i”
$ftp = “ftp://username:password@ftp.server.com/$i”

“ftp url: $ftp”

        $webclient = New-Object System.Net.WebClient
        $uri = New-Object System.Uri($ftp) 

        “Uploading $File…”

        $webclient.UploadFile($uri, $file)
$? |
Out-File -FilePath “c:\DBFileProcessScript\$(get-date -f yyyy-MM-dd).txt” -Append

        if ($? -ne “True”)
{
           Move-Item $file c:\DBBackup\Retry
         }
        else
        {
        continue
        }
}

#This portion cleans up the process folder.

Remove-Item c:\DBBackup\Process_Folder\*

#This portion sends an email with the results and any errors.

send-mailmessage -to “alerts@company.com” -from “report@company.com” -subject “File Transfer Complete” -body
“The weekly file transfer of the Database files has completed. If there were errors, they are listed here: $Error”
-smtpserver smtp.company.com

My next challenge was that this job had to run on a schedule. Since it takes approximately 5-6 hours to zip and transfer 30GB worth of database, I obviously wanted to run it during off-hours. I compiled it into an .exe and scheduled it to run at midnight using Task Manager. Unfortunately, the SQL backups were also set to run at midnight, and this script trying to run at the same time as the backups caused the server to lock up and go offline for about 20 minutes. I figured I could safely schedule it for 3 or 4 a.m., but I wanted it to start as soon as possible. So, I write a TSQL script to call this one and edited the maintenance job in SQL to run the PowerShell script upon completion of the backups. This gave me two advantages. One is that it would run immediately after backups were complete maximizing my off-hours time. Two was that if for any reason the backups failed, it wouldn’t run and delete transaction logs and clean up files that may still be needed after a failed backup.

Here is the TSQL Script I found and modified:

EXEC
sp_configure
‘show advanced options’, 1
GO
— To update the currently configured value for advanced options.
RECONFIGURE
GO
— To enable the feature.
EXEC sp_configure ‘xp_cmdshell’, 1
GO
— To update the currently configured value for this feature.
RECONFIGURE
GO
EXEC xp_cmdshell ‘powershell.exe -Command “C:\DBFileProcessScript\Zip_FTP_DBFiles”‘

As I am relatively new to TSQL scripts, I honestly don’t know if the first four commands are necessary to execute every time, but I don’t think it would hurt to re-apply them every time even if it is a persistent setting.

Next is the script to rehydrate the files on the far end.  I’ll post that once I am finished with it.
Manually Remove a Service with PowerShell

From time to time, you’ll be faced with a piece of software whose uninstall is poorly written, a virus or malware, or a freak power failure during an uninstall. In instances like these, you might have to remove an orphaned service in Windows. In my particular case, our old monitoring software was Zenith Infotech, and their software left behind two services that can really booger up an Exchange server if you don’t get rid of them.

The first thing you need to do is open up Server Manager, and drill down to the server’s services and get the name of the service(s) you need to remove by right clicking on the service and selecting properties from the sub menu:

At this point, I personally opened up regedit and verified the location of the service in the registry for sanity’s sake:

Now we have the information we need to delete the service. If you have just one service on one server, then you can just delete the service’s registry key from Registry Editor and be done with it. Since I have over 90 servers I need to do this for, I strung together these PowerShell commands to remove these services.

The first thing I decided to do was stop the service, just in case it was actually trying to do something to the OS:

Stop-Service SAAZappr

The next command identifies the registry key to be removed (everything after the HKLM: part as it appears in the bottom of the Registry Editor window highlighted above) and removes it, and by adding the –Recurse switch, we’re also telling it to automatically remove all of its sub-containers, keys and parts. For good measure, I tagged –Force on the end in the event some sort of permissions issue decided to rear its ugly head:

Get-ChildItem HKLM:\SYSTEM\CurrentControlSet\Services\SaaZAppr | Where-Object {$_.PSChildName -ne ‘CLSID’} | Remove-Item –Force

Finally, I took the data from the “ImagePath” section of the Registry Key and made sure I deleted all of the folders, subfolders, and files etc. from the server that were also potentially left behind, also using the –Recurse and –Force switches:

Remove-Item “C:\program files\SAAZOD” -Recurse –Force

The last thing I did was compile the script into an .exe to ease deployment on all of my servers. I complied into an .exe using PowerGUI Pro.

So, the final script, removing both of the SAAZ services, covering both 32 and 64 bit installations, looked like this:

# SaaZ Services Killer

# Written by Matt Richardson

# 02/14/2012

Stop-Service SAAZappr

Stop-Service SAAZapsc

Get-ChildItem HKLM:\SYSTEM\CurrentControlSet\Services\SaaZAppr | Where-Object {$_.PSChildName -ne ‘CLSID’} | Remove-Item -Force 

Get-ChildItem HKLM:\SYSTEM\CurrentControlSet\Services\SaaZapsc | Where-Object {$_.PSChildName -ne ‘CLSID’} | Remove-Item -Force

Remove-Item “C:\program files\SAAZExmonScripts” -Recurse -Force

Remove-Item “C:\program files\SAAZOD” -Recurse -Force

Remove-Item “C:\program files (x86)\SAAZExmonScripts” -Recurse -Force

Remove-Item “C:\program files (x86)\SAAZOD” -Recurse –Force

This script will get an error every time since it is trying to delete both 32 bit and 64 bit installation folders, but the errors are ambiguous and don’t stop the script from completing so I didn’t see the harm in it or the value in building in the logic to identify the version and delete accordingly.

Clean Up Orphaned Calendar Items in Exchange 2007

Updated 3/29/2012

A common problem I’ve read about, and personally experienced, is deleting a user and their mailbox, only to find out later that they had a recurring calendar meeting in a conference room, or they were an administrative assistant, or something like that. This will cause orphaned calendar items that can be a pain to clean up. When I recently ran into this problem, I noodled around trying to find an answer. I found forums on Microsoft’s site, Experts-Exchange, etc. with nothing that was really helpful. Finally, I hit up a peer of mine, Robert Durkin. Robert sent me this link of a post by Dominic Savio that got me going in the right direction.

Dominic’s post covered the basics and had the information I needed, but it still required some playing to get what I needed. So, I ended up with three commands to clean up old orphaned calendar items:

Command 1:

Export-Mailbox -Identity <user alias> -SenderKeywords “deleted_user@company.com” -IncludeFolders “\Calendar” –DeleteContent

This command will delete all calendar appointments originating from the deleted user in a single target mailbox using that deleted user’s email address. This will ensure that only calendar appointments from that user will be deleted since we’re A) using a unique string to identify the appointments and B) specifying the Calendar folder. Be careful if you’ve added the departed user’s email as an alias to another account because I didn’t test that and I am not sure what those results would be.

Command 2:

Get-Mailbox | Export-Mailbox -SenderKeywords “deleted_user@company.com” -IncludeFolders “\Calendar” –DeleteContent

This command will delete calendar appointments originating from the deleted user in every mailbox, in the unlikely event they were meeting happy.

Command 3:

Get-Mailbox -Filter {CustomAttribute14 -eq ‘ResourceMB’} | Export-Mailbox -SenderKeywords “deleted_user@company.com” -IncludeFolders “\Calendar” –DeleteContent

I borrowed the filter portion of my last post in this command to delete the appointments originating from the deleted user in every mailbox whose Custom Attribute 14 is set to ResourceMB. I went ahead and entered this custom attribute for every conference room, projector, and video cart we have so that I can clean them all up with one command.

You can also use the –TargetMailbox parameter to redirect items to a separate mailbox instead of delete them in the event of a disaster. The full list of parameters for TargetMailbox is located here.

Quick note.  I ran into a scenario where the user’s account was already deleted, so when I would run the command, it didn’t do any clean up.  When I checked the appointment, I saw that the user had ‘No e-mail address exists for this person’ in the properties in Outlook.  Since this was the case, the command using the email address obviously didn’t work.  I replaced the email address with the displayed user name in the appointment and it worked like a champ.  The modified command looked something like this:

Get-Mailbox -Filter {CustomAttribute14 -eq ‘ResourceMB’} | Export-Mailbox -SenderKeywords “Lastname, Firstname” -IncludeFolders “\Calendar” –DeleteContent

Be sure to get the ‘Lastname, Firstname” value from what is displayed in the orphaned appointment.